This page shows how one can construct hexaflexagons with any number of sides or flex patterns desired. I am not going to discuss the theory behind this method, but rather give you the steps to follow without explanation of why. This procedure is based on the 1962 papers of Antony S. Conrad and Daniel K. Hartline, see their papers, "Flexagons", and "the Theory of Flexagons" if you want to understand the underlying mathematical concepts. Additional papers by Harold V. McIntosh can be found at the same link . Of course the following procedure is also based on the same principals that the original Princeton flexagon committee developed.
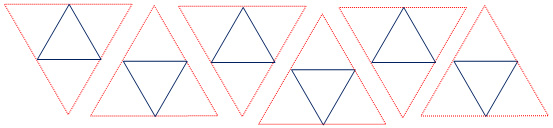
First, one needs what I will call flexagon construction mapping units, they look like this:
You can use different colored pencils or pens to draw a larger triangle with one color and a smaller triange in the middle of another color. Now, decide how many faces you want on your hexaflexagon. If you want your hexaflexagon to have n sides, then you need n-2 of the above construction units. So for a tri-hexaflexagon, you need one construction unit and for a 9 sided hexaflexagon, you need 7 construction units.
Arrange the construction units in any configuration you like, with two rules.
1. The sides of the larger triangles must match each other.
2. The inside triangles must form a single path that traverses all side points. There cannot be isolated loops in the small triangle network. As an example, one cannot arrange 6 construction units into a large hexagon which results in the small triangles forming 2 separate inside loops.
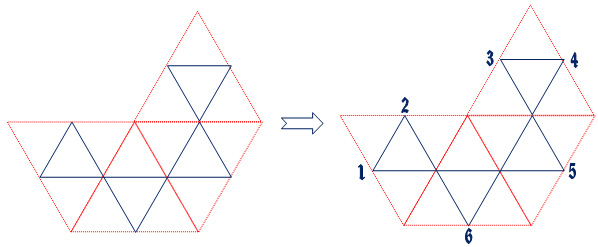
For this article, I will use a six sided hexaflexagon as an example. So, if we want to create a six sided hexaflexagon, here is one way to arrange the construction units:

Note that the inside triangles are all interconnected. This will become important soon. Different arrangements of construction units will result in different frieze patterns as well as flexing characteristics. This triangle network is called a Tukey triangle network, named after John W. Tukey who invented it. There are three ways to arrange four construction unites to make six sided hexaflexagons. Some friezes are easier to fold than others, particularly when the number of flexagon sides becomes larger. Now, starting from a mid point to one of the large triangle construction mapping units on the left side of the drawing (it is not critical which one), start numbering the mid points around the model consecutively. You will find that there are exactly the number of mid points as sides in your flexagan. For this example, there are 6. Here is out this will look:
Notice that if you start with #1 and follow the internal path created by the small triangles, the path will traverse all the mid points. In the case above, the path goes like this: 1, 2, 6, 4, 3, 5, 1, ...). This is the key to this whole process! From this number sequence we can now build a table from which we can construct the flexagon. Draw a table with three rows and n+2 columns. Where n is the number of sides for your flexagon. Enter the above number sequence such that 1 goes into the first row, first column. The sequence of numbers are entered sequentially across the columns but alternate from the first row to second row. This will be more clear by looking at our example. The result will look like the table to the left below:

I call this the "flexagon face table". In order to finish the numbering in the table, add one to the numbers in each column and enter that number in the empty cell. The numbers in the table cannot be greater than the number of flexagon sides, so in our case when we get to 6, we enter a 1 in the empty cell. The numbers circle back to #1 when they reach the number of flexagon sides. The result of this will look like the right table above where the new numbers are in red.
As we will soon see, this table represents each of the six triangles for each of the sides of the flexagon. A six sided flexagon will be constructed from 6x6=36 individual triangles. The table above actually represents 1/3 of the flexagon map plus two additional columns. The pattern for the flexagon repeats three times, so we only have to create a table for 1/3 of the flexagon. In our case of the 6 sided hexaflexagon, the pattern repeats exactly three times with the same placement of numbers in each of the three copies. Note that the two end columns in the above table, which are shaded, start the number pattern over again. These columns show how the pattern will repeat. For hexaflexagons with an odd number of sides, the numbers in the rows of the second repetition of the first goup of n columns will reverse themselves, top to bottom, in the second group of the three repititions. Take a look at the tables for odd face numbered hexaflexagons on
this page link. In all my posted construction tables, I have added the two columns of the second repetition of the table with shading so that it is clear that this is the second repetition. The third repetition of the table will be identical to the first. If you study the completed odd hexaflexagons you will see that the flexagon frieze becomes a mobius strip and the number patterns will flow according to this table when using this rule for odd and even sided flexagons.
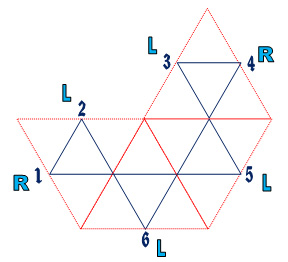
The next step will allow us create the flexagon frieze pattern. I am using the symbols R and L for right and left. Some flexagon creators like to use + and -. The idea is the same. Start with the #1 on the flexagon map. now traverse the mid points of the large triangles as we did before which are traversed via the small triangles in the map. If the large triangle sides, when going from one edge midpoint to another, are parallel, mark that mid point with the same letter (R or L) as the side you are moving from. Therefore, all line segments for connecting the midpoints of the sides of the map will have the same letter (R or L) if they are parallel. Other wise, when the large triangle sides are not parallel, mark the mid point foi the large triangle edge being moved toward with the oposite letter (R or L). If the previous side was marked R mark the one being traversed to an L. The diagram below will help in understanding this.
Be sure to study the diagrams I have posted for the Hexaflexagon models for more examples. Now we can enter these R and L values into our face table. Start with #1 and follow the inside path as before and mark the R and L values into the table. Here is the result:
We now have everything needed to build the hexaflexagon frieze. By using the above table, we can create the hexaflexagon frieze pattern as well as the face arrangements which will allow us to easily fold the hexaflexagon from the frieze. The hexaflexagon frieze pattern is constructed from the R and L values in the table. These values indicate how the triangles in the frieze will be orientated to each other. Start with the first triangle and attache another triangle to it. This first triangle will be considered a right rotation so we mark it with an R from the first column of the table. The next letter in the second column is an L. So the next triangle will rotate to the left of the second triangle. Place the triangle to the left most side of the second triangle such that it will make a hexagon if we continued counterclockwise. Now place another triangle to the left of that one again as if we are building a hexagon counterclockwise. The next column has an R in it so we now procede as if we were building a hexagon clockwise from the last triangle and place the next triangle to the side that is furthest to the right of the last triangle placement. See below how this will look as we construct the frieze pattern from the R and L values in the table.

Contiunue placing the triangles until you have placed all three repetitions of the table, which will be 36 triangles. In the case of our example the frieze pattern results in a hexagon pattern with one open edge when we complete the three table repetitions. (Remember that it is the first six columns of the table that repeat.)
The next step is to mark each of the triangles, front and back, as to which flexagon side they belong to. By doing this, it will be easy to fold and complete the hexaflexagon. The numbers for the top view of the frieze are given by the first row of the table starting from the initial triangle that we started with in creating the frieze pattern. In the diagram below, that is the yellow #1. Procede to number the tirangles in the same order they were layed out in the R and L mapping. Note the three repetitions of the table pattern in the below diagram by the three different colors for the number sequence. The reverse side of the frieze will be numbered by using the second row of the table we created. Again the numbering follows the placement of the triangles as they were constructed. (the back side will be numbered clockwise and front side counter clockwise). See below how this looks.
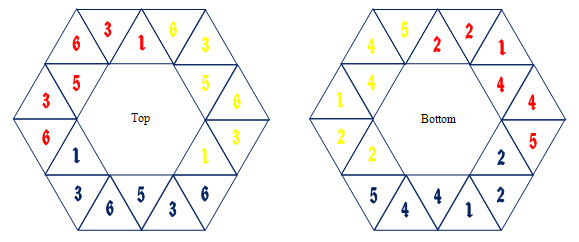
This flexagon is now ready to be cut out and folded! When folding, match pairs of numbers. For example, fold the three pairs of 4's together, then the 2's, etc. until the front and back face of the hexaflexagon have the same numbers on their faces. Tape the last two triangles together and flex!
There are a few more advanced topics if one wants to discover and create every variation. It turns out that the flexagon map we built at the start of this article can twist and turn on itself. So the map can be 3D for some flexagons. This is also true for the friezes as well. Many of the friezes for hexaflexagons of large numbers of sides will twist back and around on themselves. An example of this is on the page for the 12 sided Zodiac flexagon model of this website. Sometime I will write up an advanced hexagon creation article to cover these cases and a few other topics.